Homemade apple butter so good you’ll want to eat it by the spoonful! Slow cooker apple butter is simple to make. Peel, fill, and leave it be for some hours of simmering. Here’s the recipe to try for yourself.
This post contains affiliate links, which means I make a small commission at no extra cost to you. Always shop small, local, and/or direct when you can, though!


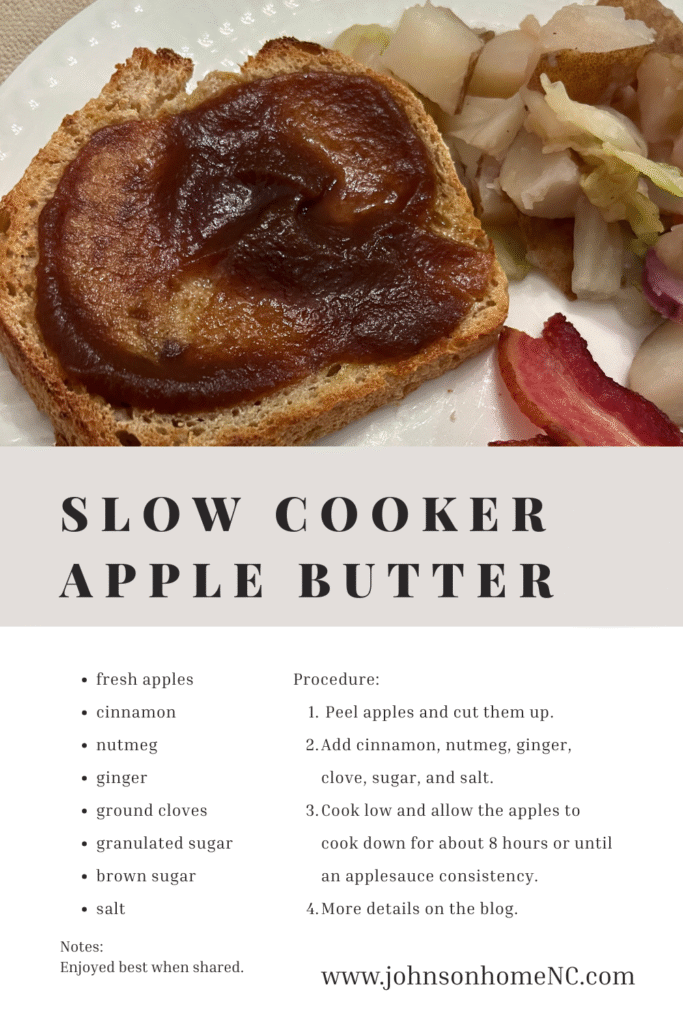
Ingredients
- fresh apples
- cinnamon
- nutmeg
- ginger
- ground cloves
- granulated sugar
- brown sugar
- salt

How to prepare slow cooker apple butter
First, peel apples and cut them up. If you prefer, use an apple corer, peel the skins off, then toss those hunks into the slow cooker as is. The apples will cook down enough that the big pieces will fall a part later. Be sure to weigh the apples after they are all cored and peeled for the most accurate weight for this recipe.
Add cinnamon, nutmeg, ginger, clove, sugar, and salt to the slow cooker.
Turn slow cooker or Crock Pot on low and allow the apples to cook down for about 8 hours or until an applesauce consistency. Cook time could be up to 12 hours.
Now, stir the dark apple butter well and prepare to store it for later. Alternatively to stirring, you may choose to use an immersion blender or a masher to break up bigger apple chunks or to smooth butter into an apple sauce consistency.
It’s really that simple. Some prep work then allow the apples to cook down slowly.
Added bonus: your home will smell delicious and delightful without the help of any fragrance candles!
How to store slow cooker apple butter long term
Fridge:
Store apple butter in air tight containers like jars with lids in the refrigerator for up to 4 weeks. Once the jar has been opened and used, it’s best to use up the apple butter within a week. You can tell it has spoiled when you see fuzz growing on top or it takes on a vinegar smell.
Freezer:
Apple butter can be stored in the freezer for around 6 months to 1 year. Some may say not even that long as longer exposure to freezing temperatures may lead to freezer burn.
Be sure to use shoulder-less, freezer safe glass jars when freezing and leave 1/2 inch head space to allow for expansion. Date the jars.
Freezer Tip: use plastic baskets you can find at dollar stores to store glass jars inside the freezer for less rattling around and potential to crack and break. Also, small pint jar won’t get lost as easily in the freezer this way.
Shelf Stable by Water Bath Canning:
Apple butter can last 1 year or longer in your pantry when it is properly water bath canned.
This recipe needs about 4 pint jars or 8 half pint jars.
Better to have too many jars than not enough. Sometimes there’s extra apple butter leftover but not enough to fill a jar for water bath canning. Lid this jar and put it in the refrigerator to eat first.
To water bath can apple butter:
- Use clean jars, lids, and rust-free rings (wash with warm soapy water or use dishwasher).
- I like to warm up and sterilize jars in the oven at 235 degrees F for 15 minutes.
- Boil water in a water bath canner or large soup pot.
- One jar at a time from oven, fill each jar leaving 1/4 inch head space.
- Wipe rim of jar with a clean, wet towel to remove any liquid or apple butter.
- Place lid and ring on jar (ring to finger-tightness).
- Carefully place jars into water bath canner.
- Once water has reached a rapid boil, cover the canner and allow jars to bathe for 15 minutes (pints) or 10 minutes (half pints).
- After time, turn off heat and allow jars to sit for 5 minutes more in the bath water.
- Carefully remove each jar and place on a towel on a space out of the way, leaving 1 inch between each jar for air flow.
- Cover jars with another towel and allow them to sit for 12 hours or until all lids have sealed. Any jars that do not seal, put directly into the fridge to eat first.
- Date all jars and label with name (free printable label in this post!)
Helpful canning tools:
- canning funnel (helps make less mess!)
- Beginner’s Canning Kit (includes water bath canner)
- Stainless Steel Canning Kit (if you already have the pot but need other supplies)
How to enjoy your homemade apple butter

- on fresh sourdough toast (easy recipe below)
- on homemade vanilla ice cream (recipe below)
- on a quick breakfast biscuit
- tied with ribbon and gifted
Free Printable Label for Apple Butter jars
I’ve created a FREE printable label for your homemade apple butter. Inside this Google Drive are many other fruit jam labels for you to have, too! Feel free to share the link with a friend.
Save the image then upload to Avery.com to print your label on any size round sticker label you have for your printer.
These labels are great for placing on top of the jar’s lid or, my favorite, on the front of the jar due to how I store my jars on the shelf. I can see what the product is better with the label on the front of the jar versus on the top.
SHOP THIS POST
Slow Cooker (also an Instant Pot. One machine, two or more uses!)
Shoulder-less, freezer safe glass jars
Half pint jars for water bath canning
More recipes like this one:
No Fuss Sourdough Loaf (perfect for your apple butter!)
Homemade Butter (real butter + apple butter on sourdough = *chef’s kiss*)

Follow Along For More
Feel free to follow Johnson Home NC on Facebook, Instagram, Pinterest, and YouTube.
Allow me to slip into your email inbox weekly with kitchen, gardening, and chicken raising real time happenings from our one acre North Carolina homestead right to you by joining our email list HERE.
Slow Cooker Apple Butter
Ingredients
Equipment
Method
- First, peel apples and cut them up. If you prefer, use an apple corer, peel the skins off, then toss those hunks into the slow cooker as is. The apples will cook down enough that the big pieces will fall a part later.
- Add cinnamon, nutmeg, ginger, clove, sugar, and salt to the slow cooker.
- Turn slow cooker or Crock Pot on low and allow the apples to cook down for about 8 hours or until an applesauce consistency.
- Now, stir the dark apple butter well and prepare to store it for later. Additionally, use an immersion blender or masher to break up big apple chunks or make smooth like an apple sauce.
- See notes for storage.